~ Abdelrahman H. Ahmed. 9/2015 ~
ModelSim is an HDL simulation software from Mentor Graphics.
1 Environment Setup and starting ModelSim
The objective of this section is to learn how to get the environment ready for the tool, take care of the licensing issues, and start the tool.
1.1 Create a working Directory
In your home directory, open a new shell. Create a new working directory for ModelSim and name it <ModelSim_StudentNumber>, then descend into that directory using the following command lines:
| >> mkdir ModelSim_StudentNumber >> cd ModelSim_StudentNumber |
Note: You will need to do this step for only the first time using the tool.
1.2 Source the setup file and run ModelSim
In the working directory that you just created, source the provided setup file. Sourcing this file will take care of all the needed environment variables/licensing. After sourcing the setup file, launch the tool.
| >> source /CMC/scripts/mentor.modelsim.10.3.csh >> vsim -64& |
ModelSim should open a window as in Figure 1.
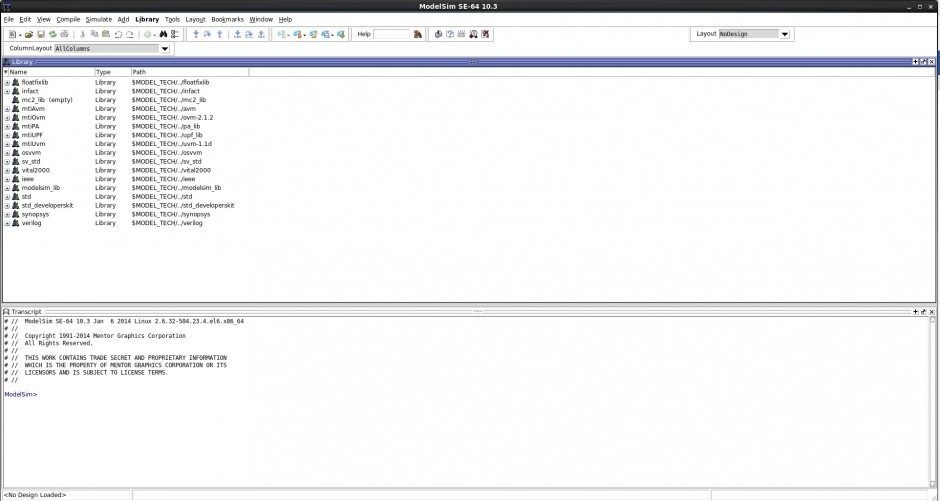
Figure 1. ModelSim initial screen
2 Create and compile Verilog modules
The objective of this section is to learn how to create a new project, deal with ModelSim’s text editor, and compile the created code.
2.1 Create a new project
From the drop-down menus go to <File –> New –> Project…>. This will open a “Create Project” window. In the Create Project window set the fields as follows and as shown in Figure 2:
Project Name = ECE402_PRJ<Project number>_<student number>
Project Location = Browse to the working directory created in section 1.1
Default Library Name = work
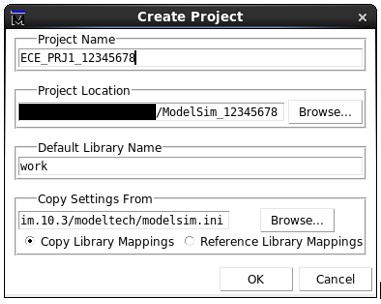
Figure 2. Create a New Project window
After clicking “OK”, a new window will open to add a new item to the project as shown in Figure 3-left. By selecting “Create New File”, a new widow named “Create Project File” will open. Fill in the file name, which should reflect the function of the module, and select the type of the file to be Verilog as shown in Figure 3-right. Then click “OK”.
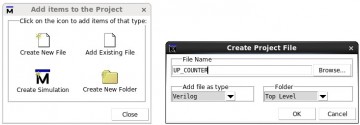
Figure 3. Create a new Verilog file
2.2 Write a Verilog file
Now you will notice that the file was added to the project, and its status is “?”. To start writing the Verilog code right-click on the file and select Edit as shown in Figure 4-left. This will open ModelSim’s text editor as shown in Figure 4-right.
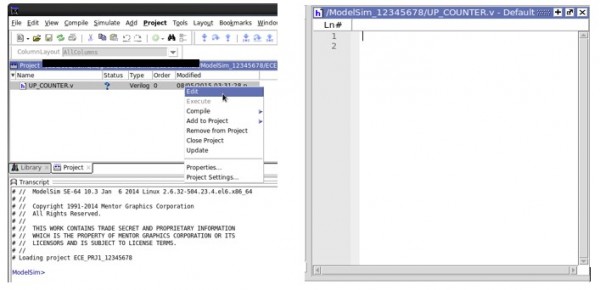
Figure 4. Left: The project tab shows the new file. Right: The text editor.
The next step is to start writing Verilog code in the text editor. In this tutorial, as an example, an 8-Bit Simple up counter will be created as shown in Figure 5.
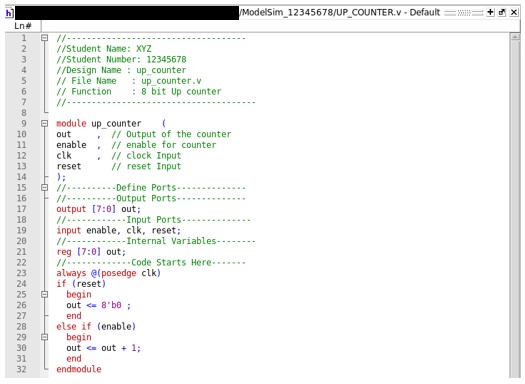
Figure 5. Verilog code for an 8-Bit Up Counter.
Note: Use detailed comments in your code – important for others reading your code, for yourself in the future, and for your grades.
2.3 Compile the Verilog file
After writing the code, go to the Project tab and right-click on the file in use. From the menu select <Compile à Compile Selected>, and note the Transcript window and the file status.
If the file has any errors, the file status will change to “X ” and a message in the transcript saying “# Compile of <file_name>.v failed with <number of errors> errors.” will appear. Clicking on the message window will open a new window that has the errors description. Correct the errors, and compile again.
If the file is clean, the file status will change to “✓” and a message in the transcript window saying “# Compile of <file_name>.v was successful” will appear.
Note: ModelSim will not check if the provided code is synthesizable or not, this is the task of the synthesis tool. So to save your time, try to make sure that you are using synthesizable Verilog from the beginning.
2.4 Create a testbench
To create a testbench, create a new file by right-clicking in the project tab then from the menu select <Add to Project –> New File…>. A “Create Project File” window will open. Fill in the fields as in section 2.1, while naming the file <file_name>_TB.v. Follow the steps as in sections 2.2 and 2.3, and write your desired testing procedure. As an example, a testbench for the 8-bit up counter is shown in Figure 6.
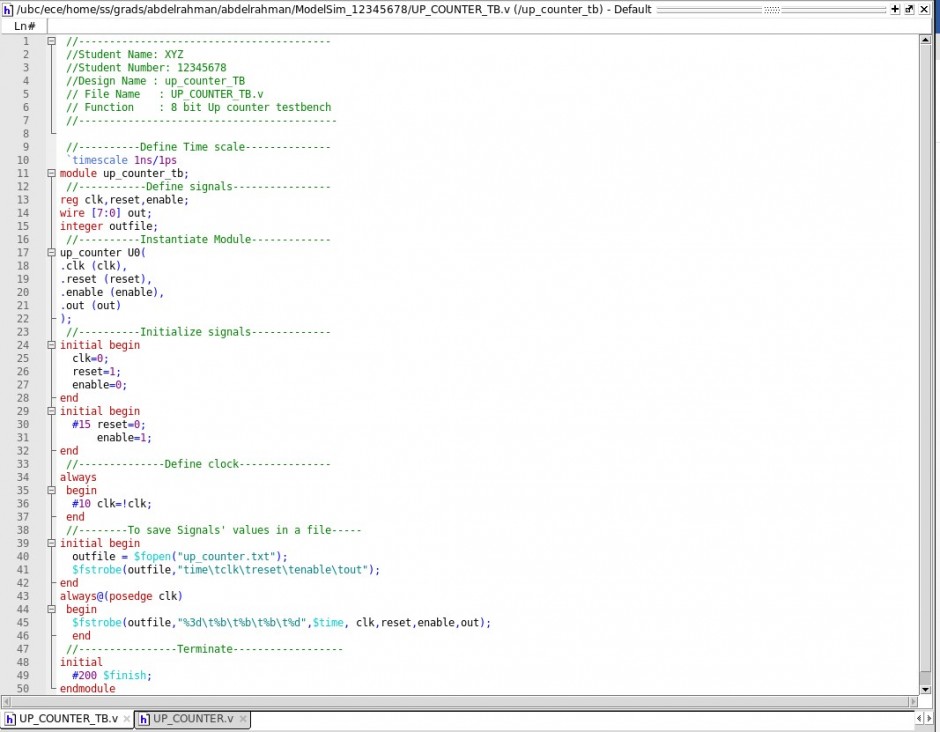
Figure 6. Verilog code for an 8-Bit Up Counter testbench.
3 Simulate un-synthesized Verilog
After preparing the Verilog code and the testbench and compiling both of them, it is now time to run the simulation and visualize the waveforms.
In the “Library” tab expand <work>, which is the specified working directory for this project. Then, right-click on the testbench file and select < Simulate without Optimization>. The layout of the ModelSim main window should change from the “NoDesign” format, shown in Figure 1, to the “Simulate” format, shown in Figure 7. Note that a new tab called “Wave” was added to your right-hand-side, and another tab called “sim” to the left-hand-side. Also, note the “Objects” window and the signals it has.
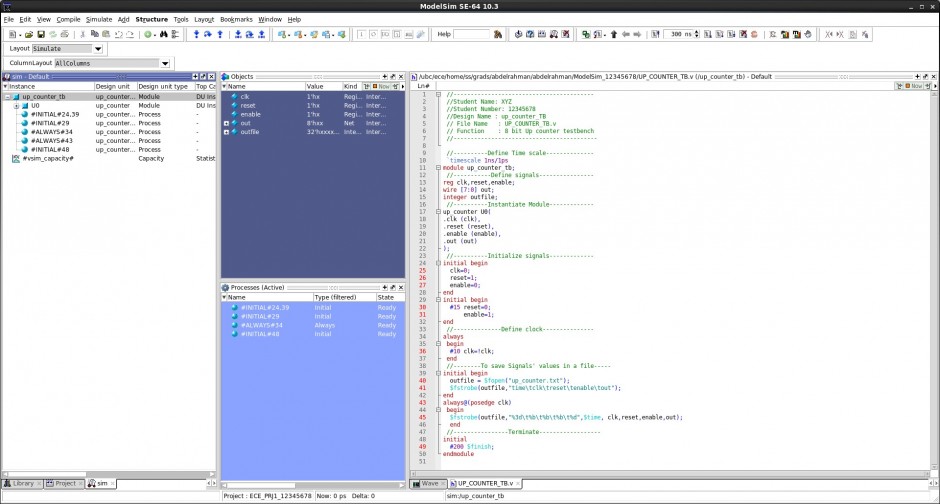
Figure 7. ModelSim window with the “Simulate” layout.
In the “Objects” window right-click anywhere and select <Add to –> Wave –> Signals in Region> this should add your main signals to the “wave” screen. Finally, from the drop-down menus go to <Simulate –> Run –> Run -All>. Note the changes in the “wave” screen. Press “F” to fit all the signals in the screen. Figure 8 shows the simulation for the 8-bit up counter. To view the changes in all the signals the out signal is expanded as in Figure 9.

Figure 8. 8-bit up counter simulation output.

Figure 9. Expanded 8-bit up counter simulation output.
The command “$fstrobe” was used to write the signals values with time to a file, which might be useful for post processing the output using other tools. Figure 10 shows a screenshot of the file that includes the saved simulation values.
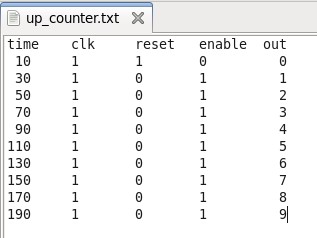
Figure 10. Simulation output written to a file.